Tired of setting up your Java Development Environment over and over again for different machines, environments or platforms? Me too! That’s why I now run my Java Developer Environments inside a Docker Container. Problem Solved.
We’ll cover how to build a Java Development Environment using NetBeans 8.2 and JDK 8 within a Docker Container (version 1.13.0). You’ll learn some simple Docker commands needed to pull that off (easy) and I’ll introduce you to the new Docker integration service that NetBeans 8.2 offers.
First off, you need to Install Docker! To get started, click on the official Docker link How to Install Docker
** 2021 Update ** If your favorite IDE is IntelliJ, then check out Docker for your Java Development Environment with IntelliJ – after reading this post since this post explains important docker details that you will want to know (which I do not repeat)
What problem are we solving?
In short; time and consistency. Like most of you, I’ve had my share of re-installs when it comes to my Java development environment. Here are some reasons I personally have come across over the years …
- Hardware problems (new computer to setup)
- Unstable O.S after update/patch/bad power off or just because!
- Support multiple projects; each with their own versions/environments
- Want to test/learn a new Java/IDE/tool release
- Starting a new job
How can Docker Help?
Not only will Docker help you eliminate the dreadful “Setup Ceremony” but it will also help you with the following points …
- Isolation : All your development environments are cleanly separated and isolated. Meaning that they can coexist on the same machine without stepping over each other (has its own file system). Easy to remove with a single command without fear that it may break some other environment.
- Fast : Containers are lightweight environments. Hundreds of Megs instead of Gigs (like a VM would take up) so their quick to start, stop, remove and even take snapshots. This also means you can have more running on the same host.
- Shareable & Reproducible : Easily share with other team members in either a tar format (on USB stick) or in native Docker Image format stored on a repository like Docker Hub. Everyone gets the same thing and it just works!
Getting the Docker Image
I’m going to go through the quickest way possible to get the Docker Image by pulling (downloading) it straight from the Docker Hub Registry.
A Docker Image is an immutable snapshot of a Container
Execute the following command on your Linux host command line (which is running Docker). While its downloading, have a coffee break.
|
1 |
docker pull mvpjava/netbeans:8.2 |
This will pull the image from MVP Java’s public Docker repository, which is identified by username “mvpjava“. The username is followed by the separator “/” in order to then specify the Docker Image name.
The Image name is “netbeans” and I tagged it (for versioning) at “8.2” so we could easy tell it apart from other versions that may exist (again separated by a “:” delimiter).
The Dockerfile
Usually you try to pull an official Docker Image without worrying about security . In this case you’ll see what went into creating it below and even be able to build it yourself, so don’t worry! I couldn’t find an official image for what I wanted, so I built it myself through a custom Dockerfile.
A Dockerfile is a script that builds the Docker Image
When you have the Dockerfile, you can see what commands went into building the Docker Image. Only after that, can you know for sure if it’s safe. Given the above advice, you can check out the Dockerfile here .
If your interested in learning how to build the Docker Image through a “Dockerfile” then I highly recommend you watch my YouTube video below which covers all of that and much more …
Listing Your Docker Images
Your now done downloading the image, you should see that it outputted a Digest and Status message as the last 2 lines of output.
We should now list all the Docker images to confirm what we got; execute the following …
|
1 |
docker images |
Your output will look something like this (but not exactly since these are my images; the important thing is that you have the mvpjava/netbeans Docker Image name under the REPOSITORY heading).

Running the Docker Container
I recommend placing the following commands in a script so that you don’t ever have to re-type all of this by hand. You can download the script with the command listed below here.
|
1 2 3 4 5 6 7 8 |
#!/bin/bash docker run -d</span> \ -e DISPLAY=$DISPLAY \ -v /tmp/.X11-unix:/tmp/.X11-unix \ -v ~/NetBeansProjects:/home/netbeans/NetBeansProjects \ --name netbeans \ netbeans:8.2 |
The docker run breakdown
- “docker run -d” means that we want to to run our container as a daemon process (in the background;). Your prompt will be returned to you.
- “-e” is how we inject environmental variables into the container. We need to pass over the $DISPLAY variable value via “-e DISPLAY” in order for NetBeans to know which X Server to connect so it can be visually rendered.
- “-v” represents volume mount point. We’re mounting a portion of the hosts directory tree “~/NetBeansProjects” (separated with a colon “:“) to that of the containers directory tree. “/home/netbeans/NetBeansProjects“. Volumes allow for separation of data from the Container. The above example keeps your NetBeans projects on the host file system and not on the Container itself. This separation of concerns is a best practice. We’re also sharing the X11 socket “/tmp/.X11-unix” which allows for X-Client communication with the X-Server (NetBeans being the X-Client).
- “–name netbeans” is the name we are giving to the Docker Container. We’ll see it get displayed later on when we go back to the command line.
- “netbeans:8.2” is the Docker Image name (with its tag 8.2) which we confirmed earlier is on our system via the “docker image” command. The Container is the physical manifestation of the Docker Image (wow, that’s deep!)
Once NetBeans finishes loading you will have the name of the Docker Container you specified via –name “netbeans” returned to the command line.
That’s it! Two simple commands (pull & run)!
After that you don’t need to use “docker pull …” again since you already have the image. Just for fun, If you want to see what Docker Containers are currently running, just execute …
|
1 |
docker ps |
You should see something like this (The IMAGE, COMMAND and NAMES should be the same for you) …

Checking out NetBean’s Docker Integration Service
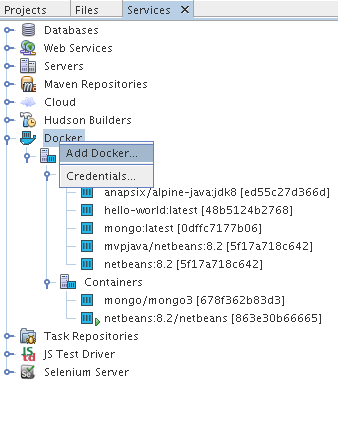
By now, you should be staring right at NetBeans. If you click on the Services tab, you’ll see our new friend Docker which allows us to simply connect to the Docker daemon running on our Linux host.
You will eventually be able to click on any Docker Image and/or Container and manage it from there instead of from the command line (like I show below; once its setup). Sweet!
Right click on the “Docker” node and select “Add Docker” from the context pop-up menu
Unfortunately, the default URL will not work if you press on the button “Test Connection”. This is because Docker is not running locally in your Container and the Docker daemon (dockerd) is not configured to listen for remote connections by default.
So there is some slight setup to perform on the Linux host machine running Docker to set this up (dependent on Linux distribution you’re using). A little bit of a pain but honestly nothing difficult when you have the right information. Check out the official docker reference daemon socket option to get setup.
Once that’s done (a one time thing) then be sure to replace 127.0.0.1 with the IP of your host running Docker. We won’t be adding any Certificate here.
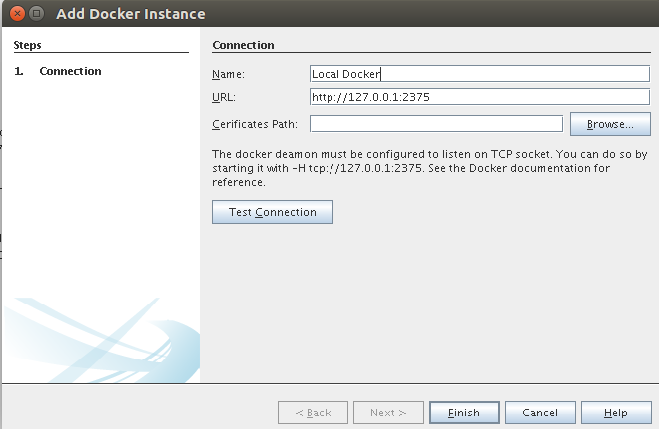
Now your all setup! you can just control your Docker Instance though the GUI when needed (just right click on the nodes).
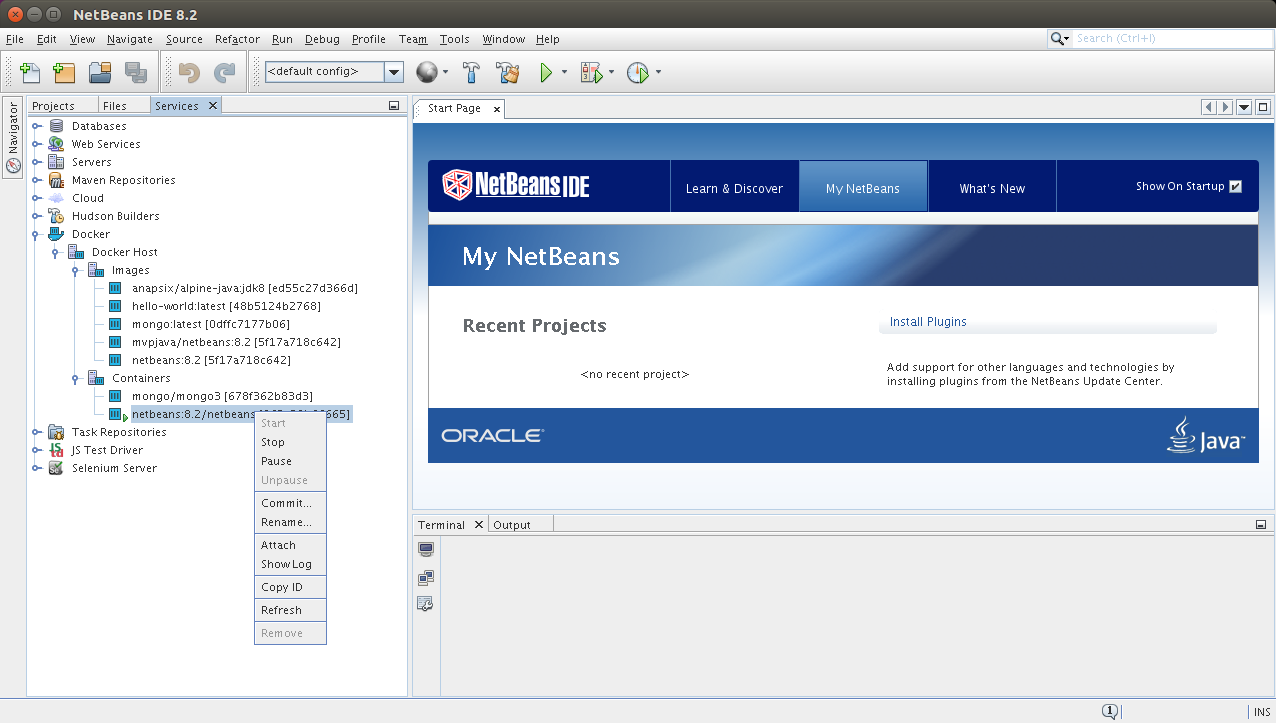
When you exit NetBeans, it will automatically close the Docker Container. You already know which command to execute to confirm that it’s not currently running anymore … “docker ps”.
The next time you want to fire it up again, all you need to do is “start” it by specifying the Docker Container name.
|
1 |
docker start netbeans |
That’s it! Your up and running, If you want to revisit and learn even more than then check out my YouTube Video Tutorial Docker for your Java Development Environment.
Bonus Round: Getting into the Docker Container?
Doesn’t it suck to be on the outside? I want in. the isolation is killing me! If you want to get into a running Container, you’ll need to specify an interactive virtual terminal. Execute the following …
|
1 |
docker exec -it netbeans bash |
The “exec” means that you want to run a command in the running NetBeans Docker Container. In this case, you want to run a “bash” shell which you will interact (-i) with via a virtual terminal (-t). Prompt appears …
Your on the inside now 😉
Want to Get Docker Certified (DCA)? Then read my blog on How I Got Docker Certified
